JDBCEx01.spring1.BoardDAO
package spring1;

import java.sql.Connection;
import java.sql.DriverManager;
import java.sql.PreparedStatement;
import java.sql.ResultSet;
import java.sql.SQLException;

public class BoardDAO {
	private Connection conn = null;

	public BoardDAO() {
		// TODO Auto-generated constructor stub
		try {
			String url = "jdbc:oracle:thin:@localhost:1521:orcl";
			String user = "scott";
			String password = "tiger";

			Class.forName("oracle.jdbc.driver.OracleDriver");
			conn = DriverManager.getConnection(url, user, password);

		} catch (ClassNotFoundException e) {
			// TODO Auto-generated catch block
			e.printStackTrace();
		} catch (SQLException e) {
			// TODO Auto-generated catch block
			e.printStackTrace();
		}
	}

	public void listDept() {
		PreparedStatement pstmt = null;
		ResultSet rs = null;

		try {
			String sql = "select * from dept";
			pstmt = conn.prepareStatement(sql);

			rs = pstmt.executeQuery();

			while(rs.next()) {
				String deptno = rs.getString("deptno");
				String dname = rs.getString("dname");
				String loc = rs.getString("loc");

				System.out.println(loc);
			}
		} catch (SQLException e) {
			// TODO Auto-generated catch block
			e.printStackTrace();
		} finally {
			if(pstmt != null) try {pstmt.close();} catch(SQLException e) {};
			if(rs != null) try {rs.close();} catch(SQLException e) {};
			if(conn != null) try {conn.close();} catch(SQLException e) {};
		}
	}
}
JDBCEx01.spring1.BoardAction - 인터페이스
package spring1;

public interface BoardAction {
	public abstract void execute();
}
JDBCEx01.spring1.ListAction
package spring1;

public class ListAction implements BoardAction {
	private BoardDAO dao;

	public ListAction(BoardDAO dao) {
		// TODO Auto-generated constructor stub
		this.dao = dao;
	}

	@Override
	public void execute() {
		// TODO Auto-generated method stub
		dao.listDept();
	}
}
JDBCEx01.spring1.ApplicationMain1
package spring1;
public class ApplicationMain1 {
public static void main(String[] args) {
// TODO Auto-generated method stub
BoardDAO dao = new BoardDAO();
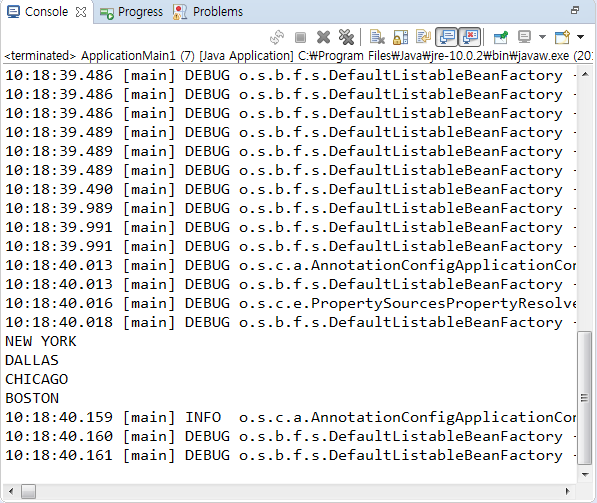
BoardAction action = new ListAction(dao);
action.execute();
}
}
위를 AnnotationConfigApplicationContext를 사용하여 해보자
JDBCEx01.spring1.BeanConfig
package spring1;

import org.springframework.context.annotation.Bean;
import org.springframework.context.annotation.Configuration;

@Configuration
public class BeanConfig {

	@Bean
	public ListAction listAction() {
		BoardDAO dao = new BoardDAO();
		return new ListAction(dao);
	}
}
JDBCEx01.spring1.ApplicationMain2
package spring1;

import org.springframework.context.annotation.AnnotationConfigApplicationContext;

public class ApplicationMain1 {

	public static void main(String[] args) {
		// TODO Auto-generated method stub

		AnnotationConfigApplicationContext ctx
		= new AnnotationConfigApplicationContext(BeanConfig.class);

		BoardAction action = (BoardAction)ctx.getBean("listAction");
		action.execute();

		ctx.close();
	}
}
Ch.3 빈 라이프사이클과 빈 범위
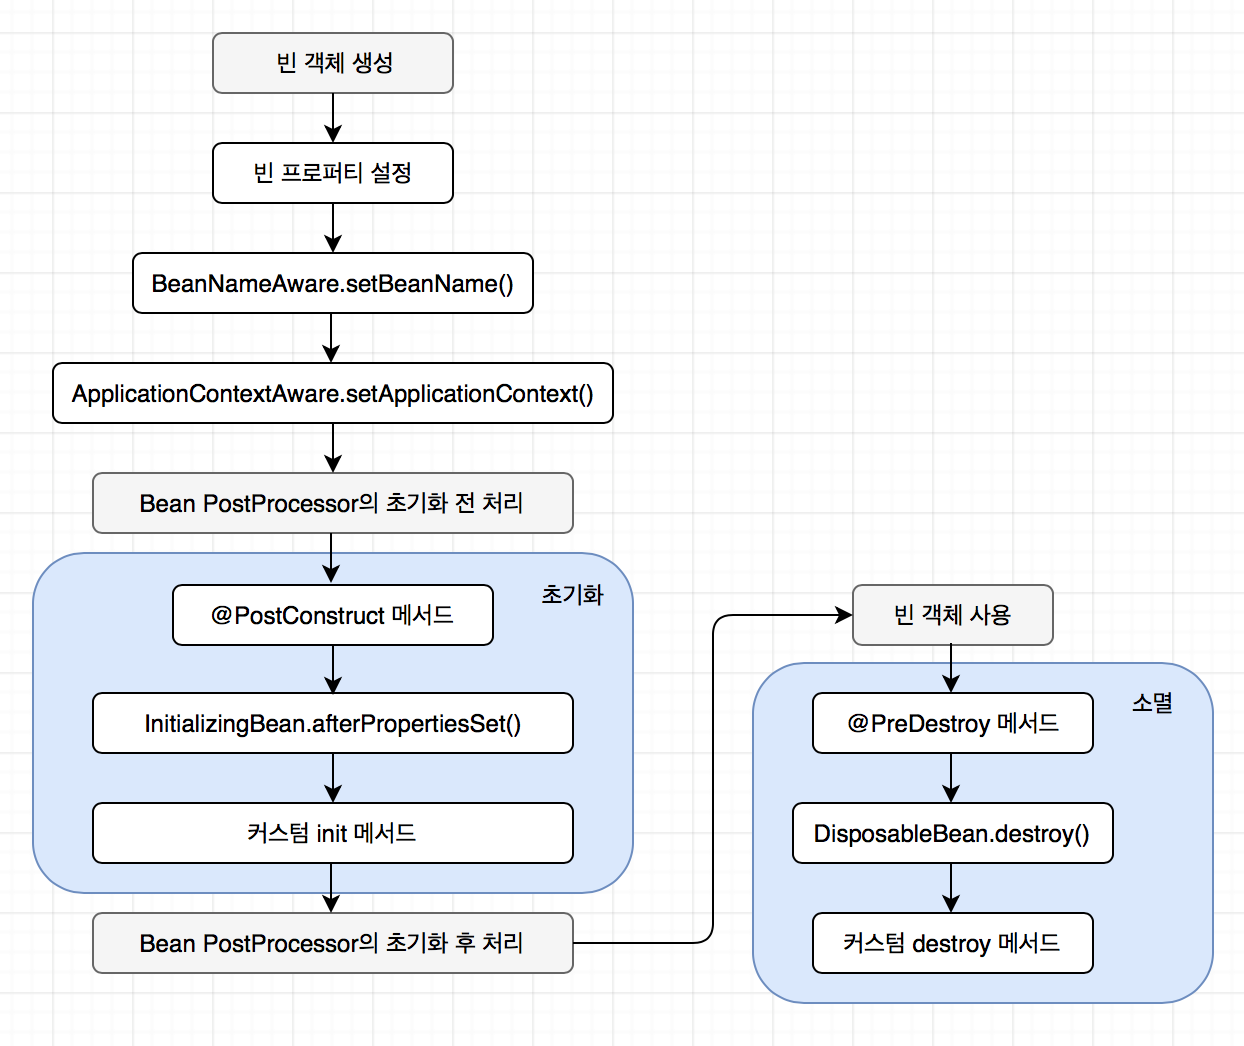
빈 객체의 라이프사이클
스프링 컨테이너는 빈 객체를 생성하고, 프로퍼티를 할당하고, 초기화를 수행하고, 사용이 끝나면 소멸시키는 일련의 과정을 관리한다.
스프링 컨테이너는 다음의 두 가지 방식을 이용해서 빈의 라이프사이클을 관리할 수 있다.
· 스프링이 제공하는 특정 인터페이스를 상속받아 빈을 구현한다.
· 스프링 설정에서 특정 메서드를 호출하라고 지정한다.
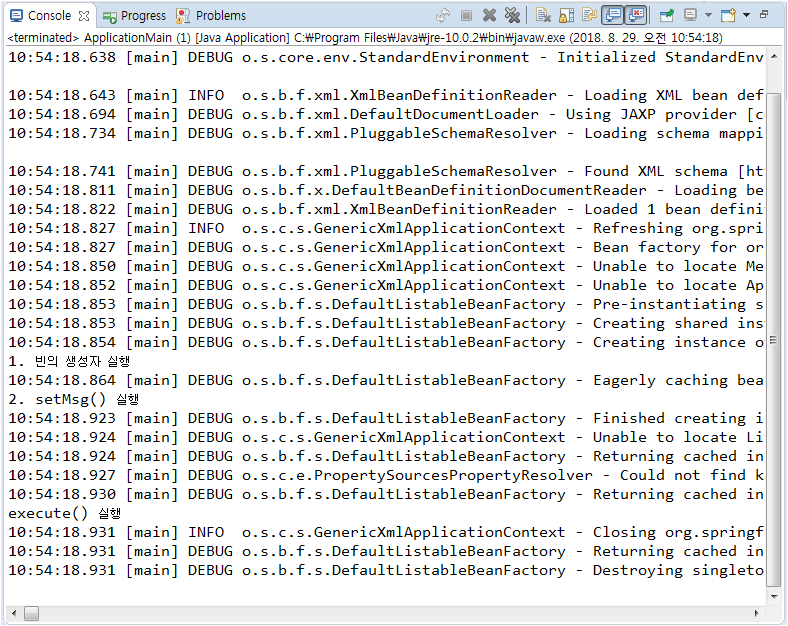
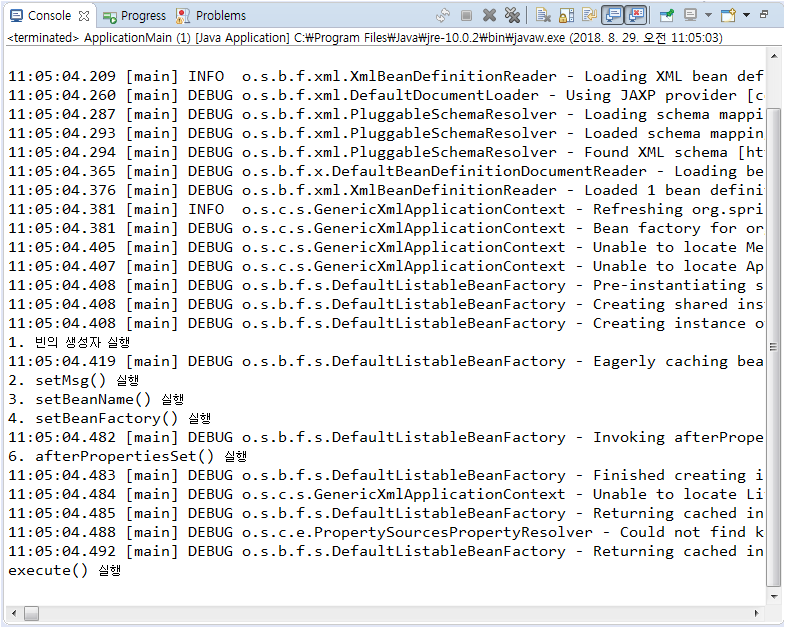
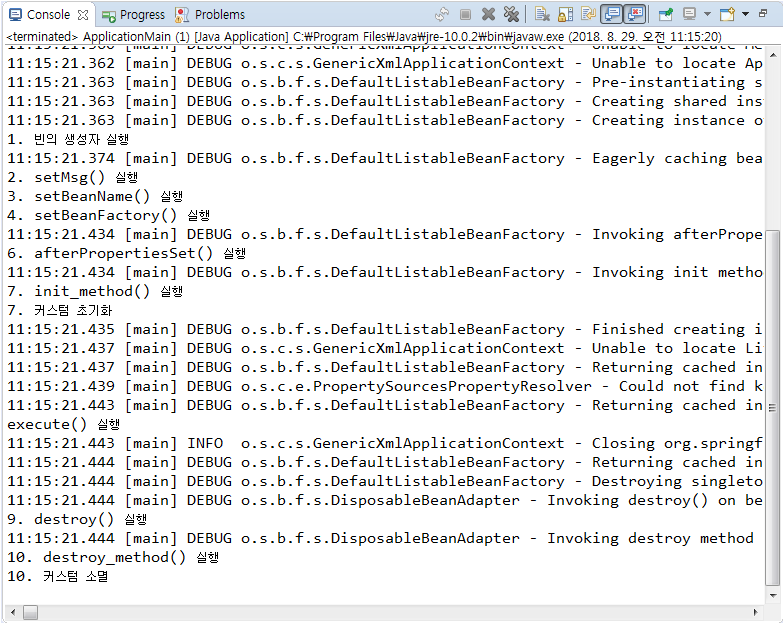
스프링은 라이프사이클에 특화된 인터페이스를 제공하고 있다. 빈 객체의 클래스가 InitializingBean 인터페이스를 구현하고 있으면 InitializingBean 인터페이스에 정의된 메서드를 호출해서 빈 객체가 초기화를 진행할 수 있도록 한다. 스프링 설정에서 초기화 메서드를 지정하면, 스프링은 그 메서드를 호출해서 빈이 초기화를 수행할 수 있게 한다.
전체 흐름은 [객체 생성/프로퍼티 설정 -> 초기화 -> 사용 -> 소멸]
LifeCycleEx01.spring1.Action
package spring1;

public interface Action {
	public abstract void execute();
}
LifeCycleEx01.spring1.WriteAction
package spring1;

public class WriteAction implements Action {
	private String msg;

	public WriteAction() {
		// TODO Auto-generated constructor stub
		System.out.println("1. 빈의 생성자 실행");
	}

	public void setMsg(String msg) {
		this.msg = msg;
		System.out.println("2. setMsg() 실행");
	}

	@Override
	public void execute() {
		// TODO Auto-generated method stub
		System.out.println("execute() 실행");
	}
}
LifeCycleEx01.spring1.context
<?xml version="1.0" encoding="UTF-8"?>
<beans xmlns="http://www.springframework.org/schema/beans"
	xmlns:xsi="http://www.w3.org/2001/XMLSchema-instance"
	xsi:schemaLocation="http://www.springframework.org/schema/beans http://www.springframework.org/schema/beans/spring-beans-4.3.xsd">

	<bean id="action" class="spring1.WriteAction">
		<property name="msg">
			<value>Hello Spring</value>
		</property>
	</bean>
</beans>
LifeCycleEx01.spring1.ApplicationMain
package spring1;

import org.springframework.context.support.GenericXmlApplicationContext;

public class ApplicationMain {

	public static void main(String[] args) {
		// TODO Auto-generated method stub
		GenericXmlApplicationContext ctx
			= new GenericXmlApplicationContext("classpath:spring1/context.xml");

		Action action = (Action)ctx.getBean("action");

		action.execute();

		ctx.close();
	}
}
lifecyle 빈 인터페이스 추가하기
LifeCycleEx01.spring1.WriteAction

package spring1;

import org.springframework.beans.BeansException;
import org.springframework.beans.factory.BeanFactory;
import org.springframework.beans.factory.BeanFactoryAware;
import org.springframework.beans.factory.BeanNameAware;
import org.springframework.beans.factory.DisposableBean;
import org.springframework.beans.factory.InitializingBean;

public class WriteAction implements Action, BeanNameAware, BeanFactoryAware, DisposableBean, InitializingBean {
	private String msg;
	private String beanName;
	private BeanFactory beanFactory;

	public WriteAction() {
		// TODO Auto-generated constructor stub
		System.out.println("1. 빈의 생성자 실행");
	}

	public void setMsg(String msg) {
		this.msg = msg;
		System.out.println("2. setMsg() 실행");
	}

	@Override
	public void execute() {
		// TODO Auto-generated method stub
		System.out.println("execute() 실행");
	}

	@Override
	// 커넥션 풀 초기화 - InitializingBean Interface
	public void afterPropertiesSet() throws Exception {
		// TODO Auto-generated method stub
		System.out.println("6. afterPropertiesSet() 실행");

	}

	@Override
	// 커넥션 풀 종료 - DisposableBean Interface
	public void destroy() throws Exception {
		// TODO Auto-generated method stub
		System.out.println("9. destroy() 실행");

	}

	@Override
	// BeanFactoryAware
	public void setBeanFactory(BeanFactory beanFactory) throws BeansException {
		// TODO Auto-generated method stub
		System.out.println("4. setBeanFactory() 실행");

	}

	@Override
	// 이 인터페이스를 상속받은 빈 객체는 초기화 과정에서 빈 이름 전달 - BeanNameAware
	public void setBeanName(String name) {
		// TODO Auto-generated method stub
		System.out.println("3. setBeanName() 실행");

	}
}
o.s.beans.factory.initializingBean : 빈의 초기화 과정에서 실행될 메서드를 정의
o.s.beans.factory.DisposableBean : 빈의 소멸 과정에서 실행될 메서드를 정의
o.s.beans.factory.BeanNameAware : 이 인터페이스를 상속받은 빈 객체는 초기화 과정에서 빈 이름을 전달받는다.

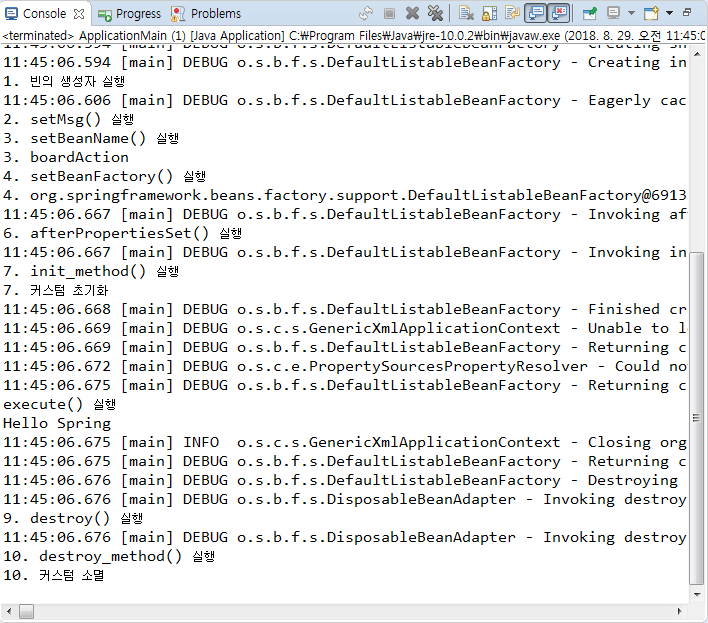
ctx.close()를 주석처리하면 9. destroy() 실행이 뜨지 않는다. 즉 커넥션 풀 종료가 안되었다는 뜻이다.
커스텀 init 메서드와 커스텀 destroy 메서드
: 외부에서 제공받은 라이브러리가 있는데, 이 라이브러리의 클래스를 스프링 빈으로 사용해야 할 수도 있다. 이 라이브러리의 클래스는 초기화를 위해 init() 메서드를 제공하고 있는데, 이 init() 메서드는 어너테이션을 갖고 있지 않고 InitializingBean 인터페이스를 상속받지도 않았을때 스프링은 이런 경우에도 초기화 메서드를 실행할 수 있도록 커스텀 초기화 및 소멸 메서드를 지정하는 방법을 제공하고 있다
.
XML 설정을 사용한다면 init-method 속성과 destroy-method 속성을 사용해서 초기화 및 소멸 과정에서 사용할 메서드의 이름을 지정할 수 있다.
LifeCycleEx01.spring1.context
<?xml version="1.0" encoding="UTF-8"?>
<beans xmlns="http://www.springframework.org/schema/beans"
	xmlns:xsi="http://www.w3.org/2001/XMLSchema-instance"
	xsi:schemaLocation="http://www.springframework.org/schema/beans http://www.springframework.org/schema/beans/spring-beans-4.3.xsd">

	<bean id="action" class="spring1.WriteAction" init-method="init_method" destroy-method="destroy_method">
		<property name="msg">
			<value>Hello Spring</value>
		</property>
	</bean>
</beans>
위 진행되는 프로세스를 이해할 것
위 과정은 커스텀 초기화 및 소멸이 어떤 단계에서 실행되는지 확인하기 위함이였고, 라이프사이클 인터페이스를 제외하고 실행을 하면 아래와 같다.
LifeCycleEx01.spring1.WriteAction2
package spring1;

import org.springframework.beans.BeansException;
import org.springframework.beans.factory.BeanFactory;

public class WriteAction2 implements Action {
	private String msg;
	private String beanName;
	private BeanFactory beanFactory;

	public WriteAction2() {
		// TODO Auto-generated constructor stub
		System.out.println("1. 빈의 생성자 실행");
	}

	public void setMsg(String msg) {
		this.msg = msg;
		System.out.println("2. setMsg() 실행");
	}

	@Override
	public void execute() {
		// TODO Auto-generated method stub
		System.out.println("execute() 실행");
	}

	public void init_method() {
		System.out.println("7. init_method() 실행");
		System.out.println("7. 커스텀 초기화");
	}

	public void destroy_method() {
		System.out.println("10. destroy_method() 실행");
		System.out.println("10. 커스텀 소멸");
	}
}
LifeCycleEx01.spring1.context
<?xml version="1.0" encoding="UTF-8"?>
<beans xmlns="http://www.springframework.org/schema/beans"
	xmlns:xsi="http://www.w3.org/2001/XMLSchema-instance"
	xsi:schemaLocation="http://www.springframework.org/schema/beans http://www.springframework.org/schema/beans/spring-beans-4.3.xsd">

	<bean id="action" class="spring1.WriteAction2" init-method="init_method" destroy-method="destroy_method">
		<property name="msg">
			<value>Hello Spring</value>
		</property>
	</bean>
</beans>

자바 기반 설정을 사용한다면, @Bean 어노테이션의 initMethod 속성과 destroy Method 속성을 사용하면 된다.
@Bean(initMethod = "init", destroyMethod = "destroy") public ConnPool3 connPool3() { return new ConnPool3(); }
초기화와 소멸 과정에서 사용될 메서드는 파라미터를 가져서는 안된다.
BeanNameAware 인터페이스
빈 객체에서 로그를 기록할 때 빈의 이름을 남기고 싶다면 아래와 같이 BeanNameAware 인터페이스를 이용한다.
BeanNameAware 인터페이스를 상속받아 구현한 클래스는 setBeanName() 메서드를 이용해서 빈의 이름을 전달받는다. 따라서, 로그 메시지에 빈의 이름을 함께 기록해야 할 때처럼 빈의 이름이 필요한 경우에 BeanNameAware 인터페이스를 사용하면 된다.
주로 같은 타입을 가진 빈 객체들이 두 개 이상 존재하고, 각 빈을 이름으로 구분해야 할 때, BeanNameAware 인터페이스를 사용한다.
LifeCycleEx01.spring1.WriteAction
package spring1;

import org.springframework.beans.BeansException;
import org.springframework.beans.factory.BeanFactory;
import org.springframework.beans.factory.BeanFactoryAware;
import org.springframework.beans.factory.BeanNameAware;
import org.springframework.beans.factory.DisposableBean;
import org.springframework.beans.factory.InitializingBean;

public class WriteAction implements Action, BeanNameAware, BeanFactoryAware, DisposableBean, InitializingBean {
	private String msg;
	private String beanName;
	private BeanFactory beanFactory;

	public WriteAction() {
		// TODO Auto-generated constructor stub
		System.out.println("1. 빈의 생성자 실행");
	}

	public void setMsg(String msg) {
		this.msg = msg;
		System.out.println("2. setMsg() 실행");
	}

	@Override
	public void execute() {
		// TODO Auto-generated method stub
		System.out.println("execute() 실행");
		System.out.println(msg);
	}

	@Override
	// 커넥션 풀 초기화 - InitializingBean Interface
	public void afterPropertiesSet() throws Exception {
		// TODO Auto-generated method stub
		System.out.println("6. afterPropertiesSet() 실행");

	}

	@Override
	// 커넥션 풀 종료 - DisposableBean Interface
	public void destroy() throws Exception {
		// TODO Auto-generated method stub
		System.out.println("9. destroy() 실행");

	}

	@Override
	// BeanFactoryAware
	public void setBeanFactory(BeanFactory beanFactory) throws BeansException {
		// TODO Auto-generated method stub
		System.out.println("4. setBeanFactory() 실행");

		this.beanFactory = beanFactory;
		System.out.println("4. " + beanFactory);

	}

	@Override
	// 이 인터페이스를 상속받은 빈 객체는 초기화 과정에서 빈 이름 전달 - BeanNameAware
	public void setBeanName(String name) {
		// TODO Auto-generated method stub
		System.out.println("3. setBeanName() 실행");

		this.beanName = name;
		System.out.println("3. " + beanName);

	}

	public void init_method() {
		System.out.println("7. init_method() 실행");
		System.out.println("7. 커스텀 초기화");
	}

	public void destroy_method() {
		System.out.println("10. destroy_method() 실행");
		System.out.println("10. 커스텀 소멸");
	}
}
LifeCycleEx01.spring1.context
<?xml version="1.0" encoding="UTF-8"?>
<beans xmlns="http://www.springframework.org/schema/beans"
	xmlns:xsi="http://www.w3.org/2001/XMLSchema-instance"
	xsi:schemaLocation="http://www.springframework.org/schema/beans http://www.springframework.org/schema/beans/spring-beans-4.3.xsd">

	<bean id="boardAction" class="spring1.WriteAction" init-method="init_method" destroy-method="destroy_method">
		<property name="msg">
			<value>Hello Spring</value>
		</property>
	</bean>
</beans>
PostProcessor - 초기화 전, 후 빈에 대한 처리
LifeCycleEx01.spring1.CustomBeanPostProcessor
package spring1;
import org.springframework.beans.BeansException;
import org.springframework.beans.factory.config.BeanPostProcessor;
// 전처리를 위한 프로세서
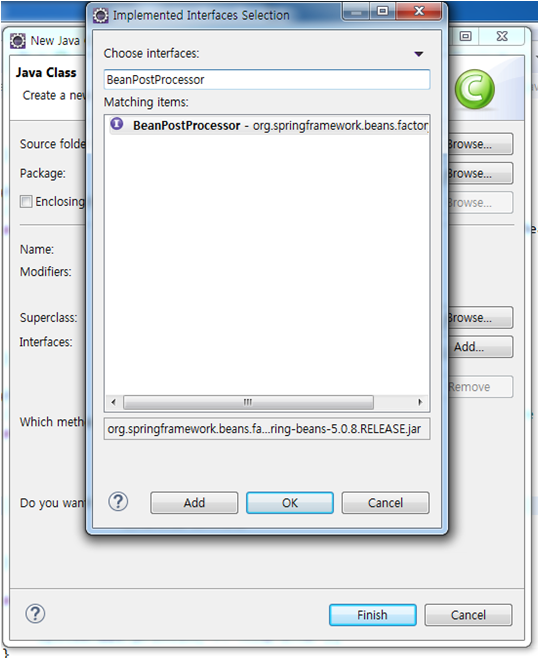
public class CustomBeanPostProcessor implements BeanPostProcessor {
@Override
public Object postProcessAfterInitialization(Object bean, String beanName) throws BeansException {
// TODO Auto-generated method stub
System.out.println("8. 초기화 후 빈에 대한 처리");
return bean;
}
@Override
public Object postProcessBeforeInitialization(Object bean, String beanName) throws BeansException {
// TODO Auto-generated method stub
System.out.println("5. 초기화 전 빈에 대한 처리");
return bean;
}
}
LifeCycleEx01.spring1.context
<?xml version="1.0" encoding="UTF-8"?>
<beans xmlns="http://www.springframework.org/schema/beans"
	xmlns:xsi="http://www.w3.org/2001/XMLSchema-instance"
	xsi:schemaLocation="http://www.springframework.org/schema/beans http://www.springframework.org/schema/beans/spring-beans-4.3.xsd">

	<bean id="boardAction" class="spring1.WriteAction" init-method="init_method" destroy-method="destroy_method">
		<property name="msg">
			<value>Hello Spring</value>
		</property>
	</bean>

	<bean class="spring1.CustomBeanPostProcessor" />
</beans>
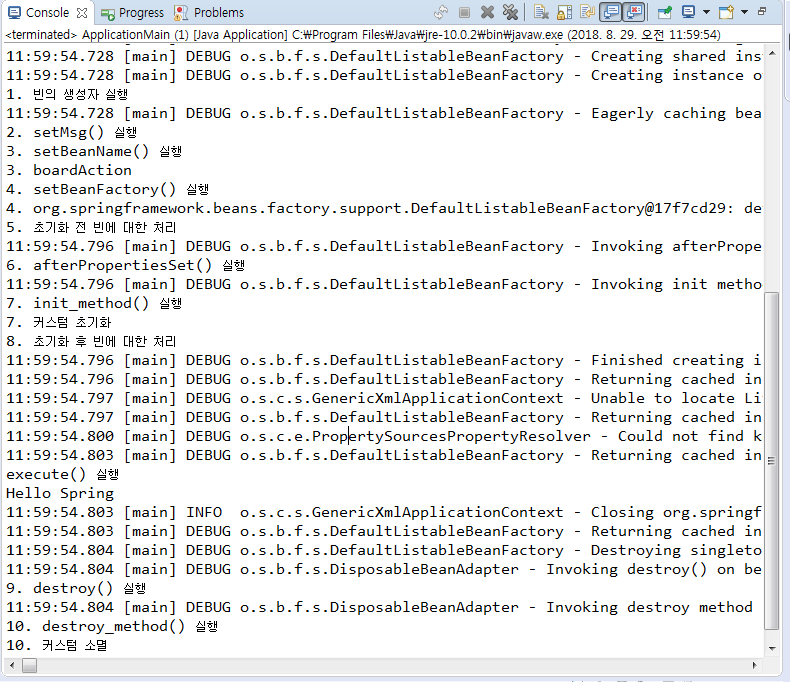
수행 결과가 위 그림과 같음을 확인할 수 있다.
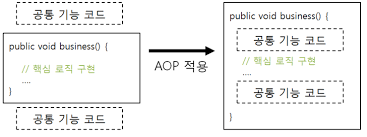
Ch.6 스프링 AOP
: 어플리케이션은 다양한 공통 기능을 필요로 한다.(로깅, 트랜잭션, 보안)
공통 기능 : 공통 관심 사항(cross-cutting concern)
핵심 기능 : 핵심 관심 사항(core concern)
중복된 코드를 양산하는 한계를 극복하기 위해 AOP라는 기법이 소개되었다.
AOP 소개
Aspect Oriented Programming, 줄여서 AOP는 문제를 바라보는 관점을 기준으로 프로그래밍하는 기법을 말한다.
핵심 로직을 구현한 코드에서 공통 기능을 직접적으로 호출하지 않는다. 핵심 로직을 구현한 코드를 컴파일하거나, 컴파일 된 클래스를 로딩하거나, 또는 로딩한 클래스의 객체를 생성할 때 AOP가 적용되어 핵심 로직 구현 코드안에 공통 기능이 삽입된다.
AOP 라이브러리가 공통 기능을 알맞게 삽입해주기 때문에, 개발자는 게시글 쓰기나 목록 읽기와 같은 핵심 로직을 구현할 때 트랙잭션 적용이나 보안검사와 같은 공통 기능을 처리하기 위한 코드를 핵심 로직 코드에 삽입할 필요가 없다.

AOP 용어
중요 용어
★ Advice : 언제(어느 시점(위치)에 : 메서드의 호출 전이냐 후냐) 공통 관심 기능을 핵심 로직에 적용할 지
★ Weaving : 공통 코드를 핵심 로직 코드에 삽입하는 것(Advice를 적용하는 것)
★ Aspect : 여러 객체에 공통으로 적용되는 기능
Joinpoint : Advice를 적용 가능한 지점
Pointcut : Joinpoint의 부분 집합으로 실제로 Advice가 적용되는 Joinitpoint를 나타냄
세 가지 Weaving 방식
· 컴파일 시에 Weaving 하기
· 클래스 로딩시에 Weaving 하기
· 런타임 시에 Weaving 하기
컴파일 시 : AspectJ에서 사용하는 방식으로 핵심 로직을 구현한 자바 소스 코드를 컴파일 할 때, 알맞은 위치에 공통 코드를 삽입하면, 컴파일 결과 AOP가 적용된 클래스 파일이 생성됨.
클래스를 로딩할 때 : AOP 라이브러리는 JVM이 클래스를 로딩할 때 클래스 정보를 변경할 수 있는 에이전트를 제공하며 이 에이전트는 로딩한 클래스의 바이너리 정보를 변경하여 알맞은 위치에 공통 코드를 삽입한 새로운 클래스 바이너리 코드를 사용하도록 한다. 즉, 원본 클래스 파일은 변경하지 않고 클래스를 로딩할때에 JVM이 변경된 바이트 코드를 사용하도록 함으로써 AOP를 적용한다.
런타임 시 : 소스코드나 클래스 정보 자체를 변경하지 않는다. 프로식를 이용하여 AOP를 적용한다. 프록시 기반의 AOP는 핵심 로직을 구현한 객체에 직접 접근하는 것이 아니라 중간에 프록시를 생성하여 프록시를 통해서 핵심 로직을 구현한 객체에 접근하게 된다.

프록시는 핵심 로직을 실행하기 전 또는 후에 공통 기능을 적용하는 방식으로 AOP를 구현하게 된다. 메서드가 호출될 때에만 Advice를 적용할 수 있기 때문에 필드 값 변경과 같은 Joinpoint에 대해서는 적용할 수 없는 한계가 있다.
스프링에서의 AOP
스프링은 자체적으로 프록시 기반의 AOP를 지원한다. 스프링 AOP는 메서드 호출 Joinpoint만을 지원한다. 필드 값 변경과 같은 Joinpoint를 사용하고 싶다면 AspectJ와 같이 다양한 Joinpoint를 지원하는 AOP 도구를 사용해야 한다.
스프링은 세 가지 방식으로 AOP를 구현한다
· XML 스키마 기반의 POJO 클래스를 이용한 AOP 구현
· AspectJ에서 정의한 @Aspect 어노테이션 기반의 AOP 구현
· 스프링 API를 이용한 AOP 구현
내부적으로 프록시를 이용하여 AOP가 구현되므로 메서드 호출에 대해서만 AOP를 적용할 수 있다는 것에 유의하자.
AOPEx01.spring.Action
package spring;

public interface Action {
	public abstract void execute();
}
AOPEx01.spring.WriteAction
package spring;

public class WriteAction implements Action {
	private String name;

	public void setName(String name) {
		this.name = name;
	}

	@Override
	public void execute() {
		// TODO Auto-generated method stub
		System.out.println("execute() 시작");
		System.out.println("Hello " + name);
		System.out.println("execute() 끝");
	}
}
AOPEx01.spring.context
<?xml version="1.0" encoding="UTF-8"?>
<beans xmlns="http://www.springframework.org/schema/beans"
	xmlns:xsi="http://www.w3.org/2001/XMLSchema-instance"
	xsi:schemaLocation="http://www.springframework.org/schema/beans http://www.springframework.org/schema/beans/spring-beans-4.3.xsd">

	<bean id="action" class="spring.WriteAction">
		<property name="name" value="홍길동" />
	</bean>
</beans>
AOPEx01.spring.ApplicationMain
package spring;

import org.springframework.context.support.GenericXmlApplicationContext;

public class ApplicationMain {

	public static void main(String[] args) {
		// TODO Auto-generated method stub
		GenericXmlApplicationContext ctx
			= new GenericXmlApplicationContext("classpath:spring/context.xml");

		Action action = (Action)ctx.getBean("action");
		action.execute();
	}
}
AOPEx01.aop.LoggingAdvice1
package aop;

import org.aopalliance.intercept.MethodInterceptor;
import org.aopalliance.intercept.MethodInvocation;

public class LoggingAdvice1 implements MethodInterceptor {

	@Override
	public Object invoke(MethodInvocation invocation) throws Throwable {
		// TODO Auto-generated method stub
		// 공통 관심
		System.out.println("전처리 구간");

		// core
		Object rtnObj = invocation.proceed();

		// 공통 관심
		System.out.println("후처리 구간");
		return rtnObj;
	}
}
AOPEx01.spring.context
<?xml version="1.0" encoding="UTF-8"?>
<beans xmlns="http://www.springframework.org/schema/beans"
	xmlns:xsi="http://www.w3.org/2001/XMLSchema-instance"
	xsi:schemaLocation="http://www.springframework.org/schema/beans http://www.springframework.org/schema/beans/spring-beans-4.3.xsd">

	<bean id="LoggingAdvice1" class="aop.LoggingAdvice1" />

	<!-- advice -->
	<bean id="pointAdvisor1" class="org.springframework.aop.support.DefaultPointcutAdvisor">
		<property name="advice" ref="LoggingAdvice1"/>
		<property name="pointcut">
			<bean class="org.springframework.aop.support.JdkRegexpMethodPointcut">
				<property name="pattern" value=".*execute.*"/>
			</bean>
		</property>
	</bean>

	<bean id="action" class="spring.WriteAction">
		<property name="name" value="홍길동" />
	</bean>

	<bean id="proxy" class="org.springframework.aop.framework.ProxyFactoryBean">
		<!-- 핵심 관심 -->
		<property name="target" ref="action"/>
		<!-- 공통 관심 -->
		<property name="interceptorNames">
			<list>
				<value>pointAdvisor1</value>
			</list>
		</property>
	</bean>
</beans>
AOPEx01.spring.ApplicationMain
package spring;

import org.springframework.context.support.GenericXmlApplicationContext;

public class ApplicationMain {

	public static void main(String[] args) {
		// TODO Auto-generated method stub
		GenericXmlApplicationContext ctx
			= new GenericXmlApplicationContext("classpath:spring/context.xml");

		//Action action = (Action)ctx.getBean("action");
		Action action = (Action)ctx.getBean("proxy");
		action.execute();
	}
}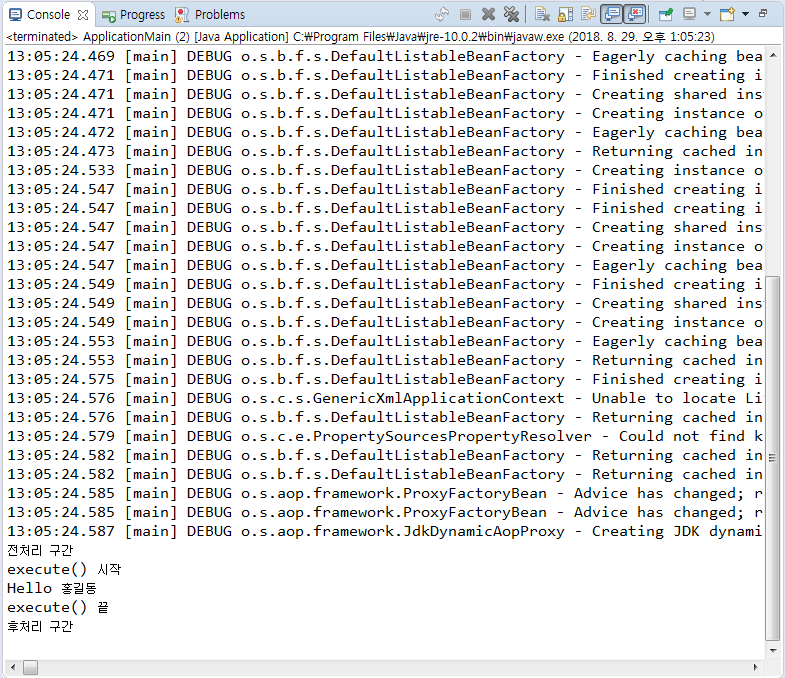
이렇게 하면 기존 서블릿을 사용할때는 수정하면 다 지워야 하는데 스프링 AOP를 이용하면 getBean에서만 수정해주면 된다는 장점이 있다.
지금까지의 과정이 위 그림과 같음을 알 수 있다.
XML 스키마 기반 AOP 퀵 스타트
XML 스키마를 이용해서 AOP를 구현하는 과정은 다음과 같다
1. 스프링 AOP를 사용하기 위한 의존을 추가한다.
2. 공통 기능을 제공할 클래스를 구현한다.
3. XML 설정 파일에 <aop:config>를 이용해서 Aspect를 설정한다. Advice를 어떤 Pointcut에 적용할지를 지정하게 된다.
StopWatch
AOPEx01.spring.WriteAction
package spring;

public class WriteAction implements Action {
	private String name;

	public void setName(String name) {
		this.name = name;
	}

	@Override
	public void execute() {
		// TODO Auto-generated method stub
		System.out.println("execute() 시작");
		for(int i=0; i<=100; i++) {
			try {
				Thread.sleep(100);	// 0.1s
			} catch (InterruptedException e) {
				// TODO Auto-generated catch block
				e.printStackTrace();
			}
		}
		System.out.println("Hello " + name);
		System.out.println("execute() 끝");
	}
}
AOPEx01.aop.LoggingAdvice1
package aop;

import org.aopalliance.intercept.MethodInterceptor;
import org.aopalliance.intercept.MethodInvocation;
import org.springframework.util.StopWatch;

public class LoggingAdvice1 implements MethodInterceptor {

	@Override
	public Object invoke(MethodInvocation invocation) throws Throwable {
		// TODO Auto-generated method stub
		// 공통 관심
		System.out.println("전처리 구간");
		System.out.println("호출 시작");

		StopWatch stopWatch = new StopWatch();
		stopWatch.start("test");

		// core
		Object rtnObj = invocation.proceed();

		// 공통 관심

		stopWatch.stop();

		System.out.println("호출 끝");

		System.out.println("수행 시간 : " + stopWatch.getTotalTimeSeconds() + "초");

		System.out.println("후처리 구간");
		return rtnObj;
	}
}
AOPEx01.spring.ApplicaitonMain
package spring;

import org.springframework.context.support.GenericXmlApplicationContext;

public class ApplicationMain {

	public static void main(String[] args) {
		// TODO Auto-generated method stub
		GenericXmlApplicationContext ctx
			= new GenericXmlApplicationContext("classpath:spring/context.xml");

		//Action action = (Action)ctx.getBean("action");
		Action action = (Action)ctx.getBean("proxy");
		action.execute();
	}
}
메소드의 이름을 알고 싶으면
AOPEx01.aop.LoggingAdvice1
package aop;

import org.aopalliance.intercept.MethodInterceptor;
import org.aopalliance.intercept.MethodInvocation;
import org.springframework.util.StopWatch;

public class LoggingAdvice1 implements MethodInterceptor {

	@Override
	public Object invoke(MethodInvocation invocation) throws Throwable {
		// TODO Auto-generated method stub
		// 공통 관심
		System.out.println("전처리 구간");
		System.out.println("호출 시작");

		StopWatch stopWatch = new StopWatch();
		stopWatch.start("test");

		// core
		Object rtnObj = invocation.proceed();

		// 공통 관심

		stopWatch.stop();

		System.out.println("호출 끝");

		String methodName = invocation.getMethod().getName();

		System.out.println(methodName + " 수행 시간 : " + stopWatch.getTotalTimeSeconds() + "초");

		System.out.println("후처리 구간");
		return rtnObj;
	}
}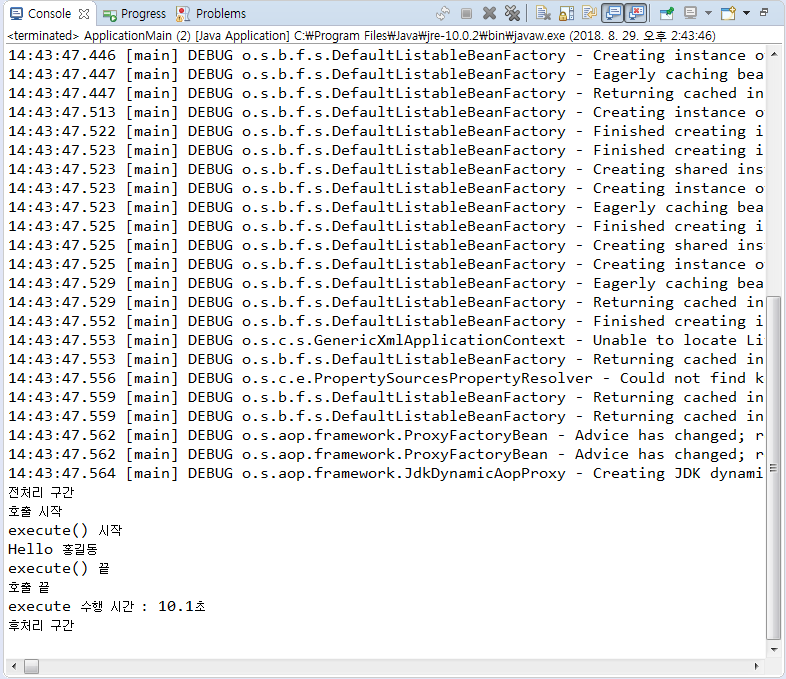
핵심 관심을 Object rtnObj = null;로 하면 핵심 관심을 찾기는 하지만 수행할 내용이 없어(값이 null이므로) 수행 결과가 없다.
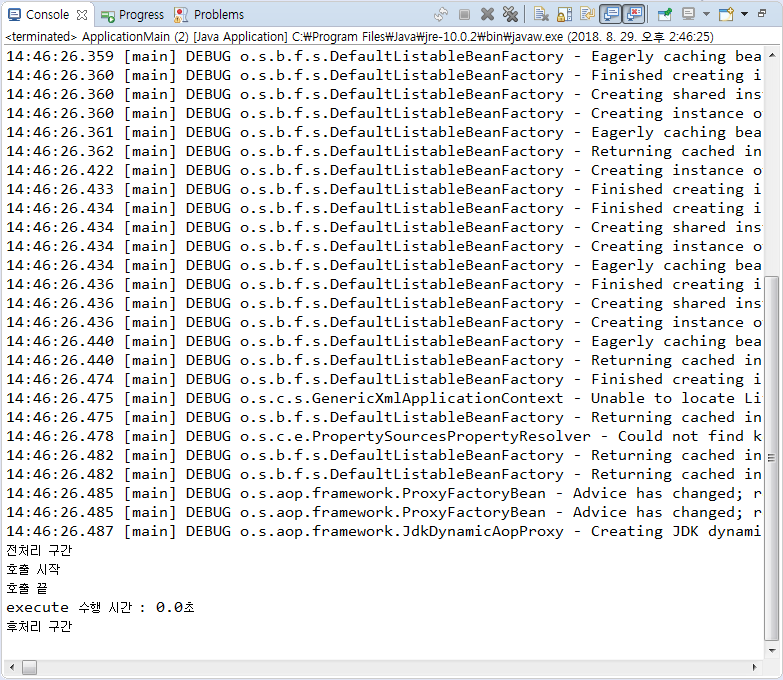
2 전처리, 후처리를 추가해주고 실행해 보자
AOPEx01.aop.LoggingAdvice2
package aop;

import org.aopalliance.intercept.MethodInterceptor;
import org.aopalliance.intercept.MethodInvocation;
import org.springframework.util.StopWatch;

public class LoggingAdvice2 implements MethodInterceptor {

	@Override
	public Object invoke(MethodInvocation invocation) throws Throwable {
		// TODO Auto-generated method stub
		// 공통 관심
		System.out.println("2 전처리 구간");

		// 핵심 관심
		Object rtnObj = invocation.proceed();

		// 공통 관심
		System.out.println("2 후처리 구간");

		return rtnObj;
	}
}
AOPEx01.spring.context
<?xml version="1.0" encoding="UTF-8"?>
<beans xmlns="http://www.springframework.org/schema/beans"
	xmlns:xsi="http://www.w3.org/2001/XMLSchema-instance"
	xsi:schemaLocation="http://www.springframework.org/schema/beans http://www.springframework.org/schema/beans/spring-beans-4.3.xsd">

	<bean id="LoggingAdvice1" class="aop.LoggingAdvice1" />
	<bean id="LoggingAdvice2" class="aop.LoggingAdvice2" />

	<!-- advice -->
	<bean id="pointAdvisor1" class="org.springframework.aop.support.DefaultPointcutAdvisor">
		<property name="advice" ref="LoggingAdvice1"/>
		<property name="pointcut">
			<bean class="org.springframework.aop.support.JdkRegexpMethodPointcut">
				<property name="pattern" value=".*execute.*"/>
			</bean>
		</property>
	</bean>

	<bean id="pointAdvisor2" class="org.springframework.aop.support.DefaultPointcutAdvisor">
		<property name="advice" ref="LoggingAdvice2"/>
		<property name="pointcut">
			<bean class="org.springframework.aop.support.JdkRegexpMethodPointcut">
				<property name="pattern" value=".*execute.*"/>
			</bean>
		</property>
	</bean>

	<bean id="action" class="spring.WriteAction">
		<property name="name" value="홍길동" />
	</bean>

	<bean id="proxy" class="org.springframework.aop.framework.ProxyFactoryBean">
		<!-- 핵심 관심 -->
		<property name="target" ref="action"/>
		<!-- 공통 관심 -->
		<property name="interceptorNames">
			<list>
				<value>pointAdvisor1</value>
				<value>pointAdvisor2</value>
			</list>
		</property>
	</bean>
</beans>
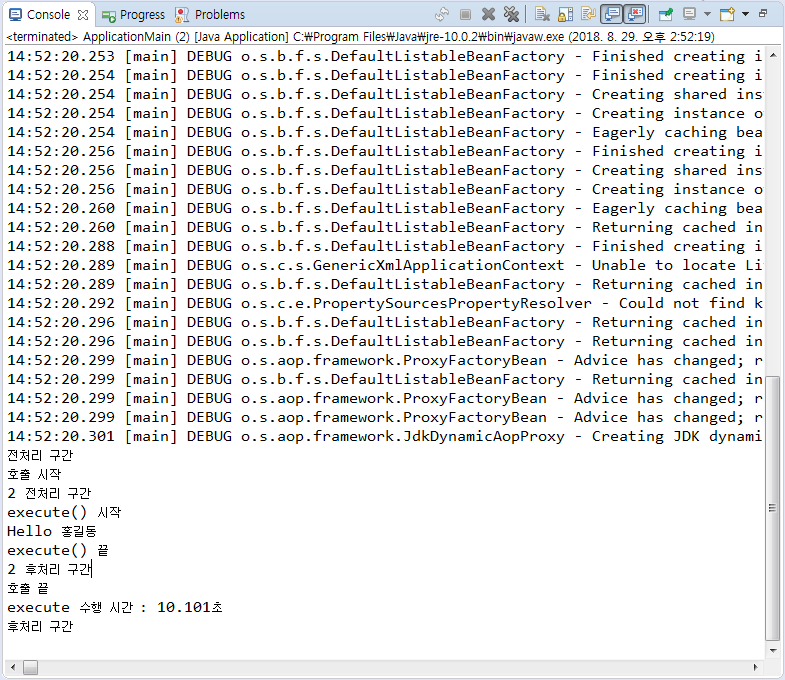
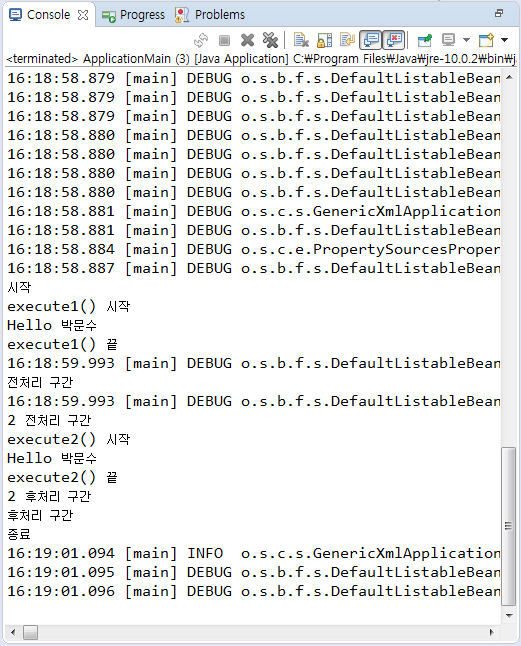
위에서 보면 1 전처리 수행후 2 전,후처리 후 1 후처리가 수행이 됨을 볼 수 있다.
만약 context의 list에서 pointAdvisor1과 2의 위치를 뒤바꾸면 2 전, 후처리가 먼저 수행되고 1이 수행된다.

Execution 명시자
execution 명시자는 Advice를 적용할 메서드를 명시할 때 사용되며, 기본 형식은 다음과 같다.
execution(수식어패턴? 리턴타입패턴 클래스이름패턴?메서드이름패턴(파라미터패턴))
'수식어패턴' 부분은 생략 가능한 부분으로 public, protected 등이 온다. 사실상 public 이외의 값은 의미가 없다.
'리턴타입패턴' 부분은 리턴 타입을 명시한다. '클래스이름패턴'과 '이름패턴' 부분은 클래스 이름 및 메서드 이름을 패턴으로 명시한다. '파라미터패턴' 부분은 매칭될 파라미터에 대해서 명시한다
각 패턴은 '*'을 이용하여 모든 값을 표현할 수 있다. 또한, '..'을 이용하여 0개 이상이라는 의미를 표현할 수 있다.
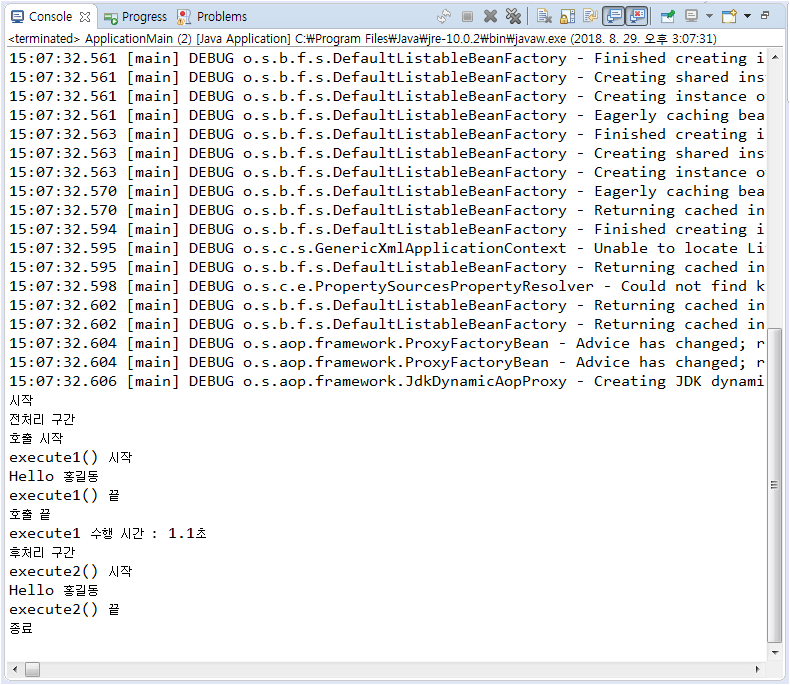
execute2()를 추가하여 1과 2가 순차적으로 수행되게 해보자
AOPEx01.spring.Action
package spring;

public interface Action {
	public abstract void execute1();
	public abstract void execute2();
}
AOPEx01.spring.WriteAction
package spring;

public class WriteAction implements Action {
	private String name;

	public void setName(String name) {
		this.name = name;
	}

	@Override
	public void execute1() {
		// TODO Auto-generated method stub
		System.out.println("execute1() 시작");
		for(int i=0; i<=10; i++) {
			try {
				Thread.sleep(100);	// 0.1s
			} catch (InterruptedException e) {
				// TODO Auto-generated catch block
				e.printStackTrace();
			}
		}
		System.out.println("Hello " + name);
		System.out.println("execute1() 끝");
	}

	@Override
	public void execute2() {
		// TODO Auto-generated method stub
		System.out.println("execute2() 시작");
		for(int i=0; i<=10; i++) {
			try {
				Thread.sleep(100);	// 0.1s
			} catch (InterruptedException e) {
				// TODO Auto-generated catch block
				e.printStackTrace();
			}
		}
		System.out.println("Hello " + name);
		System.out.println("execute2() 끝");
	}
}
AOPEx01.spring.ApplicationMain
package spring;

import org.springframework.context.support.GenericXmlApplicationContext;

public class ApplicationMain {

	public static void main(String[] args) {
		// TODO Auto-generated method stub
		GenericXmlApplicationContext ctx
			= new GenericXmlApplicationContext("classpath:spring/context.xml");

		//Action action = (Action)ctx.getBean("action");
		Action action = (Action)ctx.getBean("proxy");

		System.out.println("시작");
		action.execute1();
		action.execute2();
		System.out.println("종료");
	}
}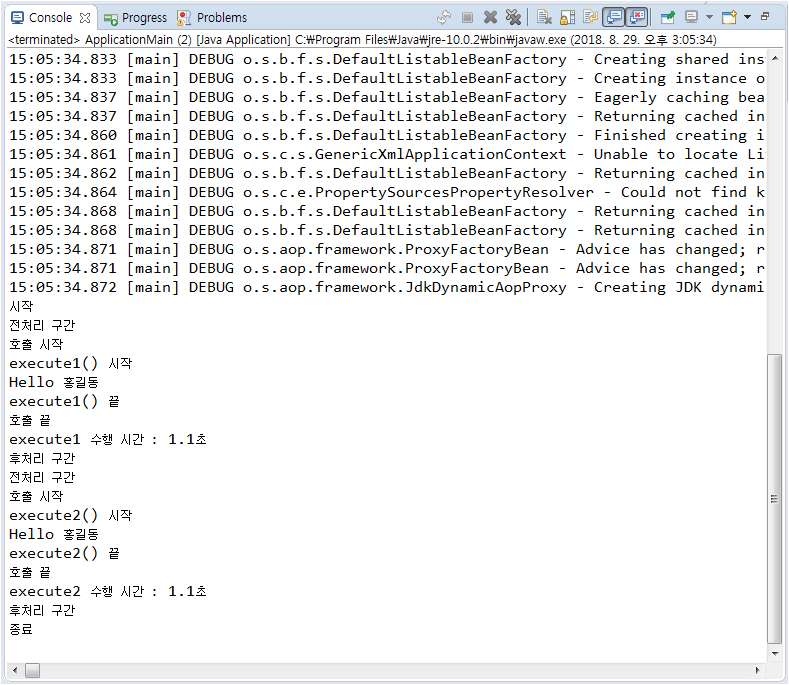
context에서 *execute1.*로 지정해주면 당연히 execute1의 advice를 수행할 것이다.execute2의 메서드는 실행이 되지만 advice는 수행하지 않는다.
즉, 특정 메서드와 메서드의 advice만 수행하고 싶을때 사용한다.
AOPEx01.spring.context
<?xml version="1.0" encoding="UTF-8"?>
<beans xmlns="http://www.springframework.org/schema/beans"
	xmlns:xsi="http://www.w3.org/2001/XMLSchema-instance"
	xsi:schemaLocation="http://www.springframework.org/schema/beans http://www.springframework.org/schema/beans/spring-beans-4.3.xsd">

	<bean id="LoggingAdvice1" class="aop.LoggingAdvice1" />

	<!-- advice -->
	<bean id="pointAdvisor1" class="org.springframework.aop.support.DefaultPointcutAdvisor">
		<property name="advice" ref="LoggingAdvice1"/>
		<property name="pointcut">
			<bean class="org.springframework.aop.support.JdkRegexpMethodPointcut">
				<property name="pattern" value=".*execute1.*"/>
			</bean>
		</property>
	</bean>

	<bean id="action" class="spring.WriteAction">
		<property name="name" value="홍길동" />
	</bean>

	<bean id="proxy" class="org.springframework.aop.framework.ProxyFactoryBean">
		<!-- 핵심 관심 -->
		<property name="target" ref="action"/>
		<!-- 공통 관심 -->
		<property name="interceptorNames">
			<list>
				<value>pointAdvisor1</value>
			</list>
		</property>
	</bean>
</beans>
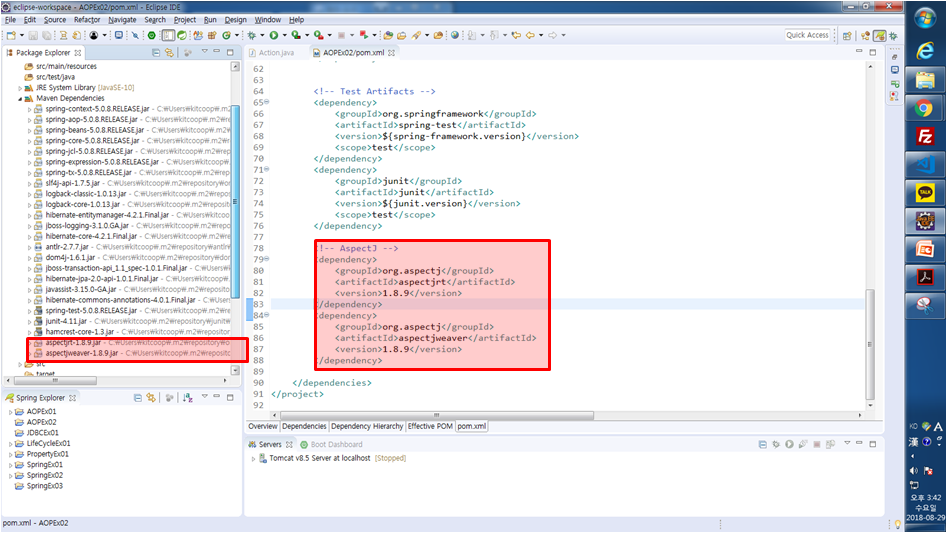
AspectJ 추가
AOPEx02.pom
<project xmlns="http://maven.apache.org/POM/4.0.0" xmlns:xsi="http://www.w3.org/2001/XMLSchema-instance" xsi:schemaLocation="http://maven.apache.org/POM/4.0.0 http://maven.apache.org/xsd/maven-4.0.0.xsd">
  <modelVersion>4.0.0</modelVersion>
  <groupId>org.springframework.samples</groupId>
  <artifactId>AOPEx02</artifactId>
  <version>0.0.1-SNAPSHOT</version>

  <properties>

		<!-- Generic properties -->
		<java.version>1.6</java.version>
		<project.build.sourceEncoding>UTF-8</project.build.sourceEncoding>
		<project.reporting.outputEncoding>UTF-8</project.reporting.outputEncoding>

		<!-- Spring -->
		<spring-framework.version>5.0.8.RELEASE</spring-framework.version>

		<!-- Hibernate / JPA -->
		<hibernate.version>4.2.1.Final</hibernate.version>

		<!-- Logging -->
		<logback.version>1.0.13</logback.version>
		<slf4j.version>1.7.5</slf4j.version>

		<!-- Test -->
		<junit.version>4.11</junit.version>

	</properties>

	<dependencies>
		<!-- Spring and Transactions -->
		<dependency>
			<groupId>org.springframework</groupId>
			<artifactId>spring-context</artifactId>
			<version>${spring-framework.version}</version>
		</dependency>
		<dependency>
			<groupId>org.springframework</groupId>
			<artifactId>spring-tx</artifactId>
			<version>${spring-framework.version}</version>
		</dependency>

		<!-- Logging with SLF4J & LogBack -->
		<dependency>
			<groupId>org.slf4j</groupId>
			<artifactId>slf4j-api</artifactId>
			<version>${slf4j.version}</version>
			<scope>compile</scope>
		</dependency>
		<dependency>
			<groupId>ch.qos.logback</groupId>
			<artifactId>logback-classic</artifactId>
			<version>${logback.version}</version>
			<scope>runtime</scope>
		</dependency>

		<!-- Hibernate -->
		<dependency>
			<groupId>org.hibernate</groupId>
			<artifactId>hibernate-entitymanager</artifactId>
			<version>${hibernate.version}</version>
		</dependency>


		<!-- Test Artifacts -->
		<dependency>
			<groupId>org.springframework</groupId>
			<artifactId>spring-test</artifactId>
			<version>${spring-framework.version}</version>
			<scope>test</scope>
		</dependency>
		<dependency>
			<groupId>junit</groupId>
			<artifactId>junit</artifactId>
			<version>${junit.version}</version>
			<scope>test</scope>
		</dependency>

		<!-- AspectJ -->
		<dependency>
			<groupId>org.aspectj</groupId>
			<artifactId>aspectjrt</artifactId>
			<version>1.8.9</version>
		</dependency>
		<dependency>
			<groupId>org.aspectj</groupId>
			<artifactId>aspectjweaver</artifactId>
			<version>1.8.9</version>
		</dependency>

	</dependencies>
</project>
AOPEx01에서 Action, WriteAction, ApplicationMain 복사한다.
AOPEx02.aop.LogginAdvice1
package aop;

import org.aspectj.lang.ProceedingJoinPoint;

public class LogginAdvice1 {
	public Object logAround(ProceedingJoinPoint joinpoint) throws Throwable {
		System.out.println("전처리 구간");

		Object rtnObj = joinpoint.proceed();

		System.out.println("후처리 구간");
		return rtnObj;
	}
}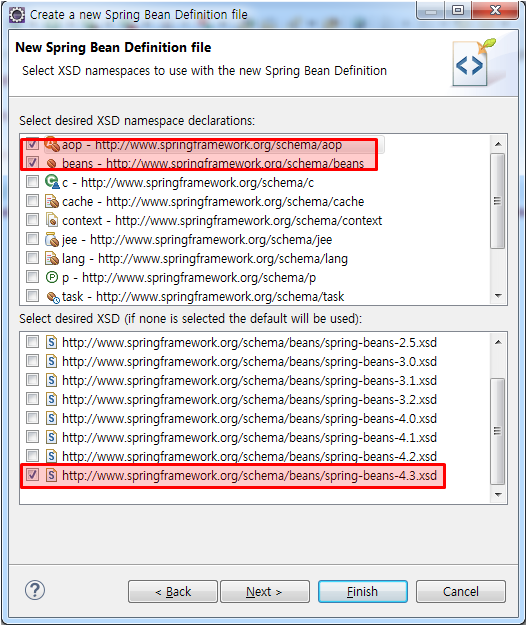
AOPEx02.spring.context
<?xml version="1.0" encoding="UTF-8"?>
<beans xmlns="http://www.springframework.org/schema/beans"
	xmlns:xsi="http://www.w3.org/2001/XMLSchema-instance"
	xmlns:aop="http://www.springframework.org/schema/aop"
	xsi:schemaLocation="http://www.springframework.org/schema/beans http://www.springframework.org/schema/beans/spring-beans-4.3.xsd
		http://www.springframework.org/schema/aop http://www.springframework.org/schema/aop/spring-aop-4.3.xsd">

	<bean id="action" class="spring.WriteAction">
		<property name="name">
			<value>박문수</value>
		</property>
	</bean>

	<bean id="LogginAdvice1" class="aop.LogginAdvice1" />

	<aop:config>
		<aop:aspect id="LogAspect" ref="LogginAdvice1">
			<aop:pointcut id="LogPointCut" expression="execution(* execute*())" />
			<aop:around method="logAround" pointcut-ref="LogPointCut" />
		</aop:aspect>
	</aop:config>
</beans>
AOPEx02.aop.LogginAdvice2 - advice2를 추가후 실행해보기
AOPEx02.aop.LogginAdvice2
package aop;

import org.aspectj.lang.ProceedingJoinPoint;

public class LogginAdvice2 {

	// 직접 선언
	public Object logAround(ProceedingJoinPoint joinpoint) throws Throwable {
		System.out.println("2 전처리 구간");

		Object rtnObj = joinpoint.proceed();

		System.out.println("2 후처리 구간");
		return rtnObj;
	}
}
AOPEx02.spring.context
<?xml version="1.0" encoding="UTF-8"?>
<beans xmlns="http://www.springframework.org/schema/beans"
	xmlns:xsi="http://www.w3.org/2001/XMLSchema-instance"
	xmlns:aop="http://www.springframework.org/schema/aop"
	xsi:schemaLocation="http://www.springframework.org/schema/beans http://www.springframework.org/schema/beans/spring-beans-4.3.xsd
		http://www.springframework.org/schema/aop http://www.springframework.org/schema/aop/spring-aop-4.3.xsd">

	<bean id="action" class="spring.WriteAction">
		<property name="name">
			<value>박문수</value>
		</property>
	</bean>

	<bean id="LogginAdvice1" class="aop.LogginAdvice1" />
	<bean id="LogginAdvice2" class="aop.LogginAdvice2" />

	<aop:config>
		<aop:aspect id="LogAspect" ref="LogginAdvice1">
			<aop:pointcut id="LogPointCut" expression="execution(* execute*())" />
			<aop:around method="logAround" pointcut-ref="LogPointCut" />
		</aop:aspect>
		<aop:aspect id="LogAspect" ref="LogginAdvice2">
			<aop:pointcut id="LogPointCut" expression="execution(* execute*())" />
			<aop:around method="logAround" pointcut-ref="LogPointCut" />
		</aop:aspect>
	</aop:config>
</beans>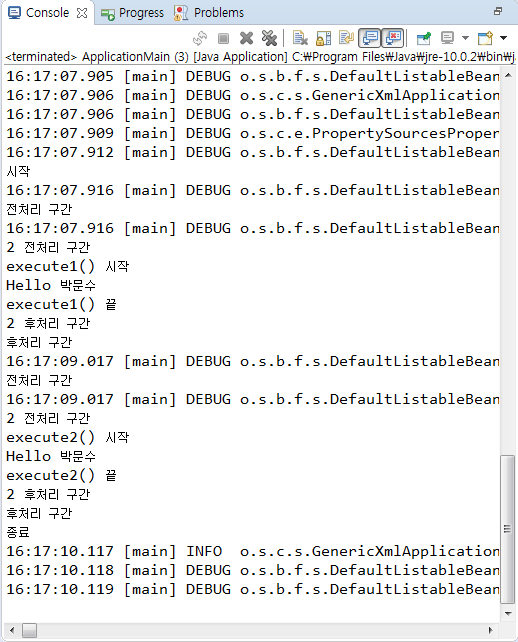
execute1(), execute2()로 설정하면 아래와 같다
'Web & Mobile > Spring' 카테고리의 다른 글
| Lecture 76 - Spring(6) Model2 게시판을 Spring으로, 전자정부프레임워크 설정법, 전자정부프레임워크 모바일 (0) | 2019.07.05 |
|---|---|
| Lecture 75 - Spring(5) Spring MVC 게시판(2), Maven (0) | 2019.07.04 |
| Lecture 74 - Spring(4) AOP, Spring MVC 게시판 (0) | 2019.07.02 |
| Lecture 72 - Spring(2) 스프링 프레임워크를 이용한 게시판 (0) | 2019.06.28 |
| Lecture 71 - Spring(1) 스프링 프레임워크 설치법, (0) | 2019.06.27 |


댓글